Culinary Class
How To Make Croissants

Buttery, flaky, and wrapped into a beautifully shaped crescent, croissants are both beloved and particularly elusive to the home cook. Often siphoned off as a French patisserie delicacy, with a little planning, patience, and a humble approach, beautifully layered croissants can be shaped, proofed, and baked right at home. TLP sat down with chef Keaton Vasek to learn his best at-home tips for these laminated pastries. Originally from Clarksville, Tennessee, Vasek studied in New York and spent his early mornings in a German bakery and found himself enraptured by the art and technicalities of laminated baking. Following his long stint in New York, he returned to Tennessee, launching a pop-up bakery during the pandemic, then leading the pastry program at the Bar Continental in Nashville.
When it comes to getting your footing with laminated dough, Vasek remarks, “to get better, you have to start. Hop into the process knowing it won’t turn out perfectly at first, but the taste will still be worth the work.”
Vasek’s Croissant Tips
- Clear your schedule: Croissants are your priority for a full day, consider this a slow time dedicated to yourself and the dough. Mix your dough the night before, laminate in the morning, and bake the following morning.
- Ingredients: Don’t be intimidated by gathering the perfect ingredients: while some people swear by Plugra butter, you can manipulate many butters to do the trick.
- Flour: This choice, however, is important. King Arthur is your best friend. You could use a generic all-purpose flour but would quickly notice a difference.
- Work Surface: Locate and maintain a proper work surface. Avoid marble or granite as these stones will absorb the heat and energy from the dough, warming it too quickly. Instead, seek out a wooden surface as it will be less conductive and sticky.
- Equipment: Get your hands on a solid rolling pin (Vasek uses a French style, which he claims is virtually indestructible), grab a ruler longer than 12 inches, and a pastry wheel (commonly known as a pizza cutter).
- Folding: As you make your folds, cut the spines to release tension and keep a better shape. Your dough will be tight overall but keeping up with your measurements will be worthwhile.
- Shaping: Don’t worry about spacing, let your croissants roll naturally. They will rest and grow into their shape naturally during proofing.
- Southern Heat: With high temperatures and high humidity, the best time to laminate is in the cool mornings. If your dough is sweating, add a little flour but do so sparingly.
- Research: Stick with one recipe and try it multiple times. Vasek suggests trying three times: one to mess up, two to anticipate and learn from your mistakes, and three to perfect it. After this, you’ll be indoctrinated in basic lamination and can explore other videos and recipes to find what you like best.
Vasek notes that croissant dough is a living thing, not to be pressured and manipulated but coaxed into a thing of beauty. Keep your fingers floured, chin up, and arm yourself with ample patience, and you’ll be rolling your own laminated croissants in no time.
Croissants

Ingredients:
1 cup water
1 cup milk
8⅓ cup all-purpose flour
1 tablespoon salt
1¼ cup sugar
2 sticks butter (for détrempe)
9 packets dry yeast
4 additional sticks unsalted
high fat butter (for beurrage)
Yield: 12 croissants
Détrempe (pronounced “day-tromp”)
- Step 1: In the base of the stand mixer, place the water, milk, and yeast. Give the liquids a whisk with the dough hook attachment to ensure the yeast is dissolved.
- Step 2: Place the all purpose flour, sugar, salt, and diced butter on top (this helps avoid clumping). Mix for 3 minutes on speed level 1.
- Step 3: Scrape down the sides of the bowl to ensure the dough has been properly hydrated. Continue to mix for 3 for 6 minutes. All butter should be thoroughly incorporated by this stage. If there is any visible butter, continue to mix on the same speed.
- Step 4: Transfer the dough to a work bench and shape into a boule. Once the boule is structurally even, use a serrated knife to mark an X half an inch deep in the dough.
- Step 5: Allow the dough to rest in the freezer just until firm. When rolled out, it will soften. Avoid frozen dough as it will crack instead of stretch during lamination.
Beurrage (pronounced "buhr-rahge")
- Step 1: Lightly soften the butter in the microwave. The ideal texture is soft, but not melted. We are looking for butter to that allows us to work with it, not against it. It’s important there is still some resistance to the butter.
- Step 2: Transfer the butter to a parchment sheet that once all four sides are folded over will be a 11 x 11 cm square. Transfer the butter block to the fridge if it needs to firm up.

Lamination
- Step 1: Lightly flour the workspace with just enough flour that the dough can be moved around without sticking. Roll the dough out to a 12cm x 24 cm rectangle. Place the butter just off set by ¼ of the way. Fold over the left and right sides of the dough to incase the butter. We like to call these wings. They are coming over like a wing to cover the butter.
- Step 2: Ensure the butter is encased and the seam of the dough lines up perfectly. If it doesn’t line up, the gap will get worse. If there is too much overlap, we will possibly force the butter to break there.
- Step 3: Using a rolling pin, “whack” the dough to ensure we are the dough and butter become one. This stage will also begin to stretch the dough. Try and equalize the thickness during the process to maintain an even shape on all sides.
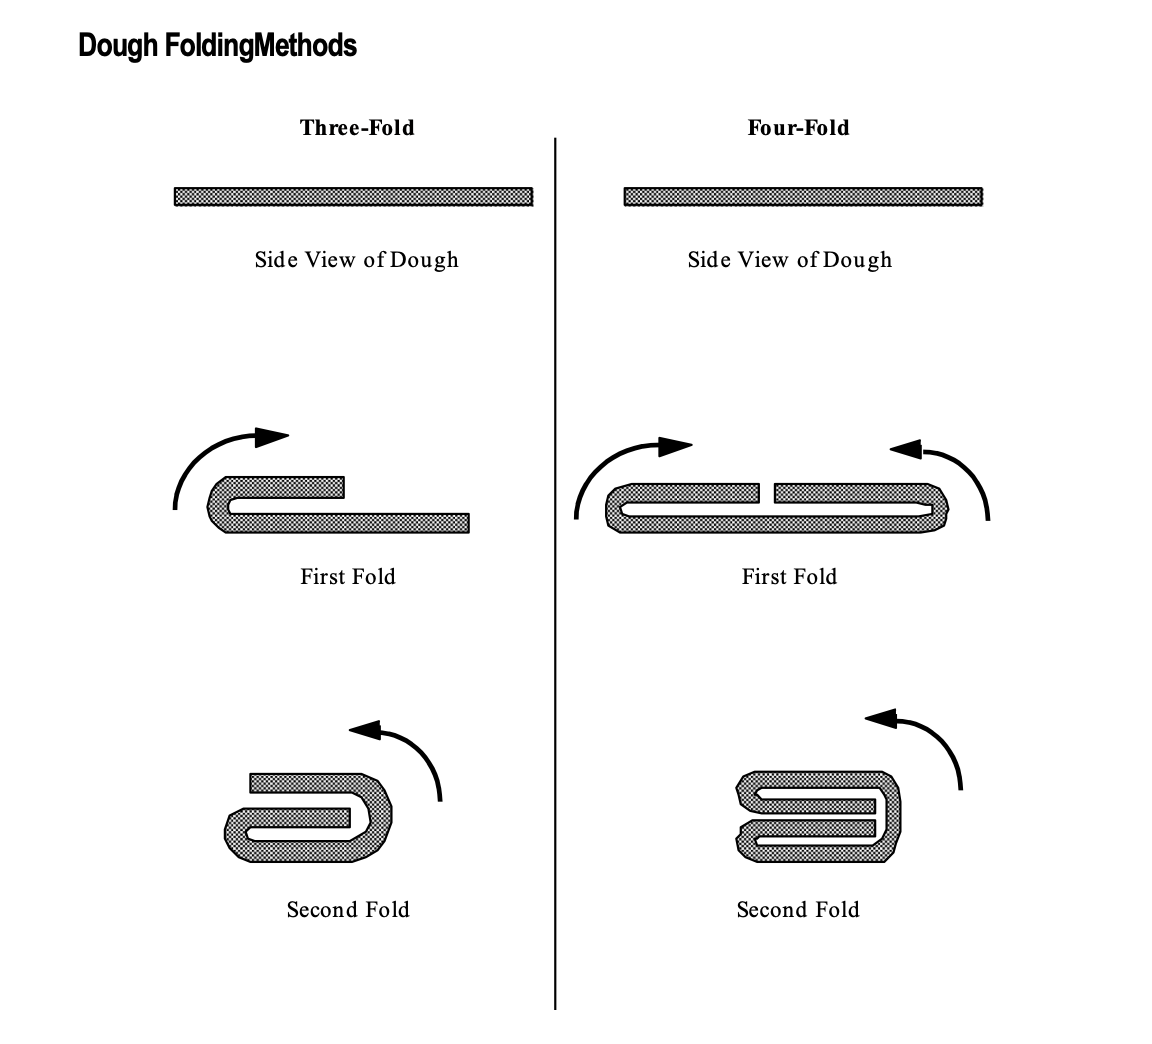
- Step 4: With the wings on the left and the right sides, roll the dough left and right to 14 cm. Rotate the dough 90 degrees so the wings are now on the top and bottom. Continue to roll the dough out to 30 cm. Perform a four-fold.
- Step 5: If the dough is still cool, proceed to the three fold. It’s okay if the dough needs to return the fridge or freezer after the first fold. Ideally, we work efficiently to where we can manage to get both folds in at once!
- Step 6: With the folds on the left and right sides, roll the dough to 14 cm left to right. Rotate the dough 90 degrees and continue to roll out to 30 cm long. Perform another three-fold. Using the rolling pin, lightly press the dough and roll to a 10 cm x 14 cm rectangle.
- Step 7: Allow the dough to rest in the freezer for 40 minutes or more. The dough should be cold but not frozen.
- Step 8: Once the dough is rested, roll the dough out to a rectangle that is 28 cm wide and 3.5 mm thick. Cut into 3 sheets and allow these sheets to rest in the fridge, on a sheet tray, covered with plastic. Rest for 1 hour.
- Step 9: Portion the croissants into triangles that are 9 cm wide and 28 cm long. Roll into croissants and allow to rest overnight.
Proofing & Baking
- Step 1: The following morning, proof the croissants until they have just over doubled in size.
- Step 2: Brush with egg was and bake at 400 for 4 minutes, rotate and lower the oven to 325 and bake until golden brown.
- Step 3: Cool 10 minutes then transfer to a cooling rack to allow the crumb to set.
share
Crafting the Perfect Croquembouche
Jackie Joseph, winner of Food Network's 2021 Best Baker in America series, walks us [...]
How to Make Appalachia’s Apple Stack Cake
Apple stack cake is a modest, rustic confection most closely associated with the Appalachian [...]
How to Make Biscotti
You don't need an Italian nonna to learn how to make biscotti from scratch. [...]


